Creating/Editing Masters
Login Company:
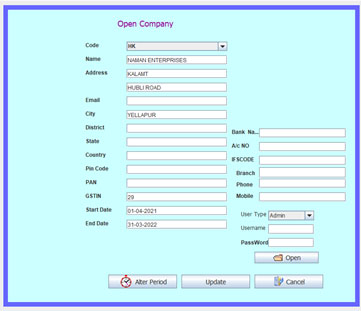
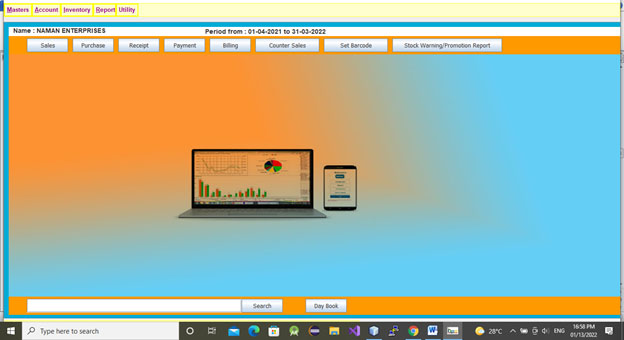
In the open company window type username- Admin press enter, type Password –Admin and press enter key or click open command. It opens accounting desktop.
Create Account Groups:
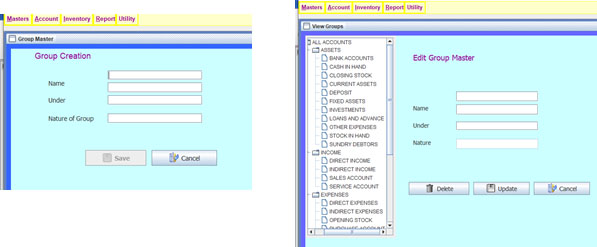
In the Master menu, point to Group then Click Group master. In the Group Window, type Group name then press enter key, cursor goes to kannada name, leave it and press enter key 2 times. It opens under list. In the list select required group option using arrow key then press enter. In the nature list also select required group nature and press enter. Cursor goes to Save button and again pressing enter key it saves.
Update /Delete Groups:
In the Master menu, point to Group then Click Group master view. In the Group view it shows created groups in the tree format. Select the group which you want to modify. Change Group name or other options then click update button. If you want to delete groups, select the group and click delete button. Default groups can’t delete.
Create Ledgers:
Create Party(Creditors and Debtors)Ledger:

In the Master menu, point to Ledgers then Click Ledger master. In the Ledger Window, type Party name then press enter key, cursor goes to kannada name, leave it and press enter key 2 times. It opens under list. In the list select Sundry creditor if party gives items for you or select sundry debtor which party takes item from you and press enter. If you want to enter opening balance of that party type the opening balance or leave it as zero, press enter key . Leave opening balance type also as Cr. or Dr. and press Enter key Cursor goes to ledger type. Leave it as default General ledger. If party is a promoter, now you can select Promoter in the ledger type and type the rate in the percent. After pressing enter key cursor goes to address field. Type the address 1, if address is big use address2 also. Fill the State, pin and Pan also. If the Party is a GST registered party then select the Regular option in the gst type combobox and type GST number. If required type mobile and email of the party. Leave the GST rate as zero and then click Save button or again pressing enter key it saves.
Create Bank Ledger:
In the Ledger Window, type Bank name then press enter key, cursor goes to kannada name, leave it and press enter key 2 times. It opens under list. In the list select Bank Accounts and press enter. If you want to enter opening balance of that Bank type the opening balance or leave it as zero, press enter key. Leave opening balance type also as Cr. or Dr. and press Enter key Cursor locates to Save button, again pressing enter key it saves.
Create Expenses Ledger:
In the Ledger Window, type Expenses head name then press enter key, cursor goes to kannada name, leave it and press enter key 2 times. It opens under list. In the list select Direct or indirect expenses and press enter. If you want to enter opening balance of that head type the opening balance or leave it as zero, press enter key. Leave opening balance type also as Cr. or Dr.. If the expenses ledger have GST, In the below Gst rate option select GST rate then Save.
Update/Delete Ledgers:
Select the ledger which you want to modify or delete , change the field as required and click update button. If you want to delete ledgers, select the ledger and click delete button. Some ledgers are created by default. You should not delete default ledgers .
Create stock Groups:
In the Master menu, point to Stock Group then Click Stock Group master. In the Stock Group Window, type Stock Group name then press enter key, cursor goes to kannada name, leave it and press enter key 2 times. It opens under list. In the list select Primary and press enter. Cursor goes to Save button and again pressing enter key it saves.
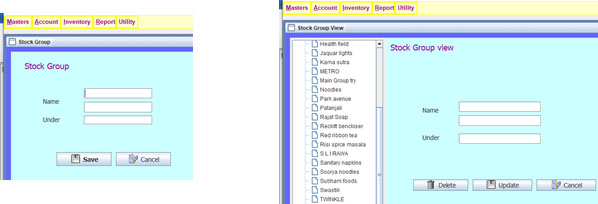
Update/Delete stock Groups:
In the Master menu, point to Stock Group then Click Stock Group master view. In the Stock Group view it shows created Stock groups in the tree format. Select the Stock group which you want to modify. Change Stock Group name or other options then click update button. If you want to delete groups, select the group and click delete button. Default group can’t delete.
Create stock Category:
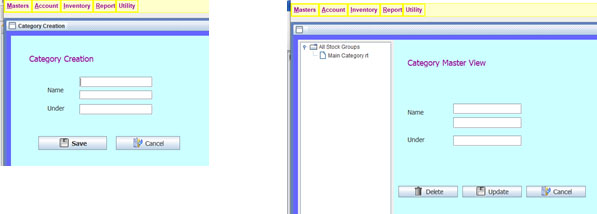
In the Master menu, point to Category then Click Category master. In the Stock Category Window, type Stock Category name then press enter key, cursor goes to kannada name, leave it and press enter key 2 times. It opens under list. In the list, select Primary and press enter. Cursor goes to Save button and again pressing enter key it saves.
Update/Delete stock Category:
In the Master menu point to Category then Click Category master view. In the Category view it shows created Categories in the tree format. Select the Category which you want to modify. Change Category name or other options then click update button. If you want to delete Category, select the category and click delete button. Default Category can’t delete.
Create Units:
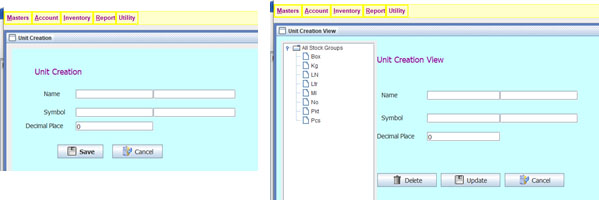
In the Master menu, point to Unit then Click Unit master. In the Unit Window, type Unit name then press enter key, cursor goes to kannada name, leave it and press enter . In the Symbol field type unit symbol and press enter, cursor goes to kannada name, leave it and press enter. Cursor goes to Save button and again pressing enter key it saves.
Update/Delete Units:
In the Master menu, point to Unit then Click Unit master view. In the Unit master view, it shows created units in the tree format. Select the unit which you want to modify. Change unit name or other options then click update button. If you want to delete units, select the unit and click delete button. Some units are created by default.
Create Items
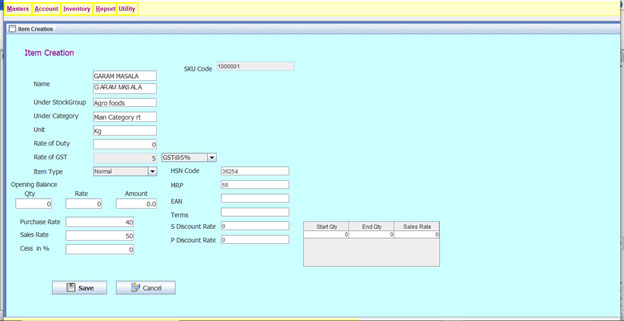
In the Master menu, point to Items then Click Items master. In the Items Window, type Item name then press enter key, cursor goes to kannada name, leave it and press enter . In the Under stock group field press enter, created stock group list shows. Select stock group using down arrow. After pressing enter key cursor goes to category field enter again, in the category list select category using down arrow press enter. In the same way select GST rate, if required enter opening balance, purchase rate, sales rate, cess, HSN code, MRP. If you use barcode, scan the barcode in the EAN field. Click Save.
Update/Delete Items
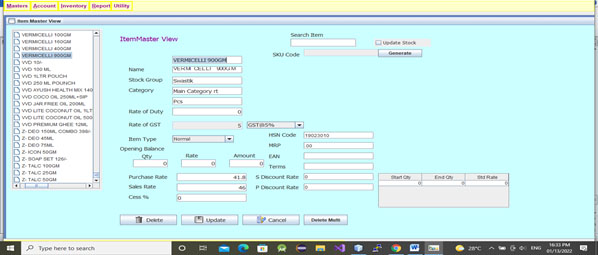
In the Master menu, point to Items then Click Items master view. In the Items master view select the items which you want to modify or type the item name in the search box and press enter key. Modify the required field and click update. If you want to delete item, click delete button.
Voucher Entries
Sales Entry
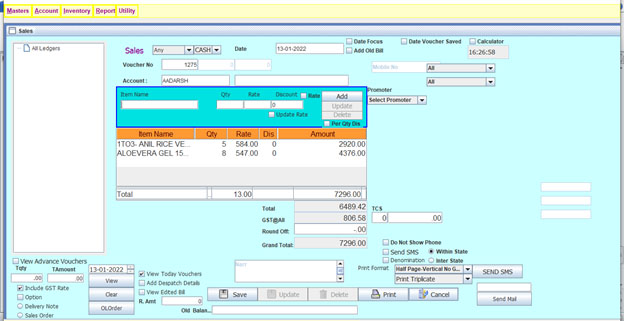
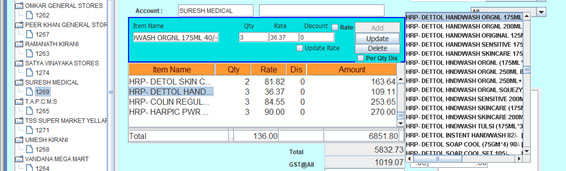
Click Sales button in the Desktop or Account menu point to Sales Bill then click Sales Bill. If you want to enter cash bill, select cash or select credit for credit bill in first combo. By default it shows current date. If you want to enter old date bill , change the date. After pressing enter key cursor goes to Account field. If you selected cash bill it shows cash or selected credit bill, you should select party. After pressing enter key it shows list of ledgers. Select required party using down arrow key and press enter. Cursor goes to Extra name field. It is not a mandatory field. But In the bill if you want to show party name you should type party name in this field. After pressing enter key item list opens. Whenever typing starting letters of the required items, cursor automatically selects items which containing that letters. Pressing enter key item name adds. Type quantity and press enter then type rate whenever rate filed is empty. If you entered sales rate in item master, sales rate shows automatically. If discount field is enable it shows discount field. Again pressing the enter key, you may enter discount value if it is necessary and pressing enter key item added. Repeat the same steps to add multiple items. After adding all items click on the save button to save bill or use enter key also. After saving it prompts to Do you want to print ?. It you want to print the bill click Yes or No to save the bill without printing.
Update/Delete Voucher
In the sales window, below the tree in the date spinner, change previous date and click view button. It shows all vouchers entered on that particular date. Click the voucher number which you want to modify and click on the records which you want to update. Change the records as your requirement and click update button on the right side. If you want to delete records, select the record and click delete button on the right side. You can add new records also. After whole modification click on the update button located at the bottom near save button. To delete voucher select the voucher and click on the delete button at bottom window.
Print Voucher:
Select voucher which you want to print. In print format default print format is selected, if you want to change print copy, select single, duplicate or triplicate and then click print button. In the print dialogbox again click print button for direct print the voucher or click preview to view voucher.
Include/Exclude GST Rate:
In the Sales window, check or uncheck the Include GST rate checkbox.
Add old bill:
If you add old bill, click add old bill checkbox, type old voucher no, Date, party/Cash, items and click save button. It gives message like Already created do you want create once again? Click on the yes.
Purchase Entry:
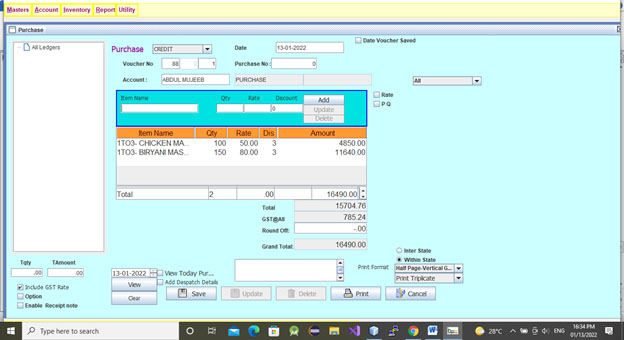
Click purchase in the Account desktop or In the Account menu point to Purchase bill and then click purchase bill. In the purchase bill window, do the same steps in the sales bill entry. After click save button it prompts to Record saved successfully.
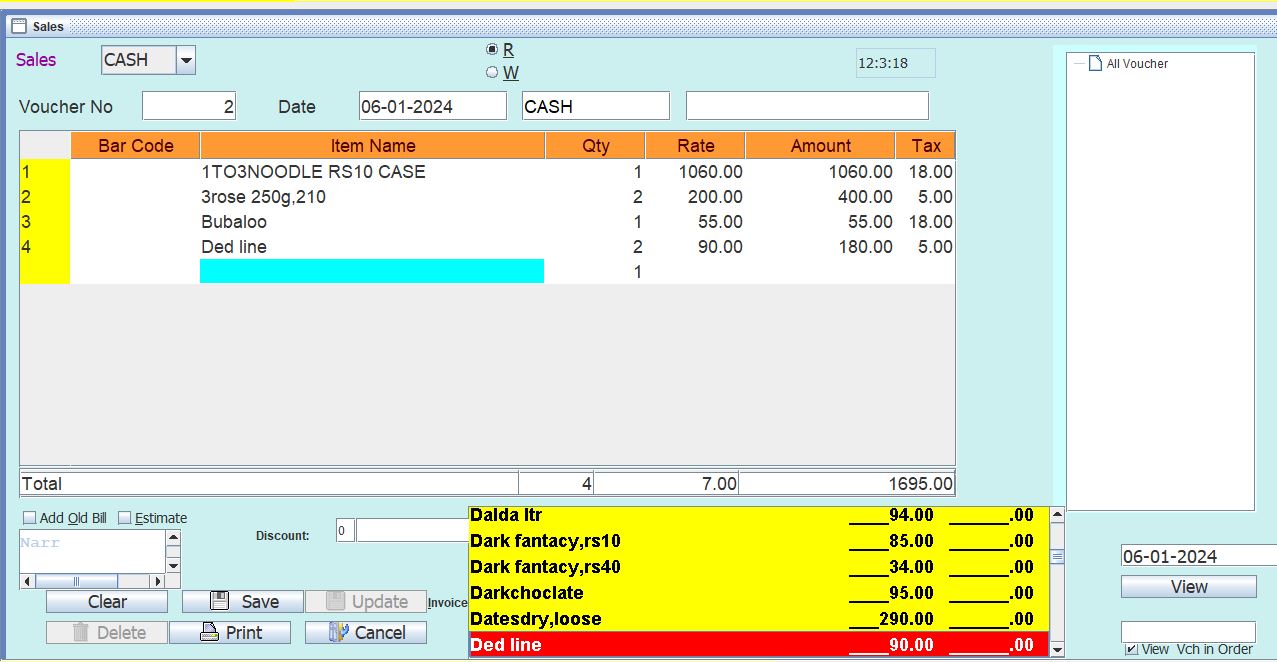
Counter Sales:

Counter sales option is used to enter the items through barcode scanner. Place the cursor to barcode field and scan the items through barcode scanner. Other options are same in sales entry.
Mart Bill
Click Billing button in the Desktop or Account menu point to Sales Bill then click Sales MartBill. If you want to enter cash bill, select cash or select credit for credit bill in first combo. By default it shows current date. If you want to enter old date bill , change the date. If you selected cash bill it shows cash or selected credit bill, you should select party. After pressing enter key it shows list of ledgers. Select required party using down arrow key and press enter. Cursor goes to Extra name field. It is not a mandatory field. But In the bill if you want to show party name you should type party name in this field. After pressing enter key cursor goes to table and item list opens. Whenever typing starting letters of the required items, cursor automatically selects items which containing that letters. Pressing enter key item name adds. Type quantity and press enter then type rate whenever rate filed shows zero. If you entered sales rate in item master, sales rate shows automatically and pressing enter key item added. Repeat the same steps to add multiple items. After adding all items click on the save button to save bill. After saving it prompts to Do you want to print ?. It you want to print the bill click Yes or No to save the bill without printing. When press Ctrl+Pagedown bill goes to print and saves automatically.
Update/Delete Voucher
In the bill window, right side tree shows current date bills. Click view button. To view old date bills, in the date spinner, change previous date and click view button. It shows all vouchers entered on that particular date. Click the voucher number which you want to modify and click on the records which you want to update, in bill table click the record which you want to modify, Change item name or rate or quantity of records as your requirement and press enter key. Using Ctrl+down arrow or Ctrl+up arrow button on the table move down and up. If you want to delete records, select the record and press Ctrl+delete. You can add new records also. After whole modification click on the update button located at the bottom near save button or press Ctrl+U. After pressing Ctrl+P voucher updates and prints also. To delete voucher select the voucher and click on the delete button at bottom window.
Receipt Entry:
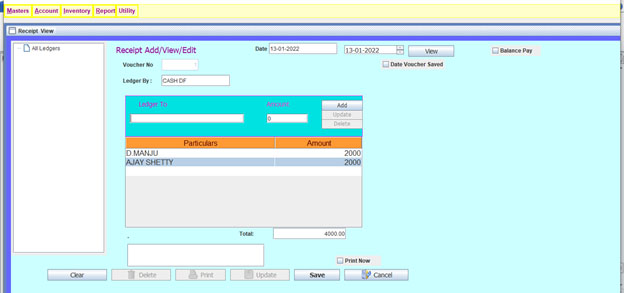
Click receipt in the account desktop or point to Account menu then Receipt. In the receipt dialog box select Ledger by cash/bank and in ledger to select required ledger account and type amount and press enter key. Then click save. We can add multiple entries or single entries. Edit and delete options are same in sales entry. Contra, Payment and Journal Entries are same like Receipt entry.
Contra Entry:

Payment Entry:

Journal Entry:

Credit Note Entry:
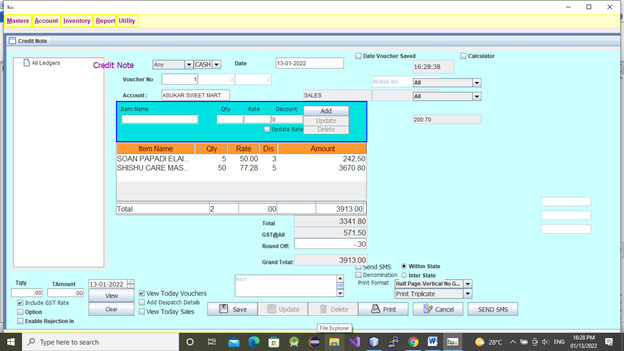
Point to Account menu then Sales Bill then click Credit Note. In the credit note dialog box, enter the returned goods from customer.
Debit Note Entry:
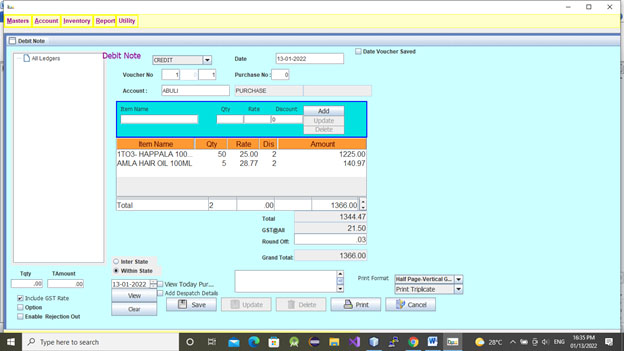
Point to Account menu then Purchase Bill then click Debit Note. In the debit note dialog box, enter the goods which are returns to supllier.
Set Barcode
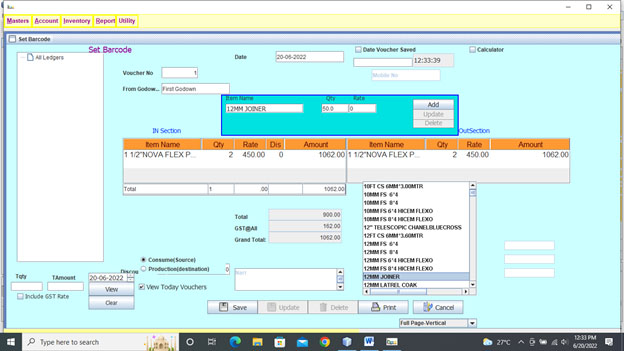
Click set Barcode in the Account Desktop or Inventory menu, then point to Set Barcode. In the set barcode window, in from godown select the godown and press enter key. Select the item, enter the qty and rate then press enter key. After adding all items click save button.
Print Barcode sticker:
Select the saved voucher then select required print format in the format combo. Click print button. Click preview or direct print button.